How to Set Up an Ad Grant Campaign
- Jun 1, 2020
- 5 min read
Updated: Apr 21, 2023
Now that your Ad Grant account has been approved, it’s time to learn how to set up an effective campaign that will surely boost your charity’s digital presence.
Here’s a failproof and beginner-friendly step-by-step walkthrough to guide you in your Google Ad Grants campaign set up.e
Setting up a campaign and selecting your campaign settings
STEP 1: Log into your Google Ad Grants account, go to your Overview dashboard and click ‘NEW CAMPAIGN’.

Another way to create a campaign is to click the Campaigns menu in the sidebar, click the blue (+) sign and select ‘New campaign’.

STEP 2:
a. Choose the goal that you want to achieve in the campaign. (You can only use one goal for each campaign).

Learn more about each campaign goal:
Sales - if you want to encourage people to complete a purchase
Leads - if you want to collect contact details and other information through a sign-up page
Website traffic - if you want more people to learn about your charity
Product and brand consideration - if you want people to know more about the products and services you’re offering
Brand awareness and reach - if you want to reach a wider audience
App promotion - if you want people to consider and install your app
For Google Ad Grant accounts, you can only select Sales, Leads, or Website traffic since the other goals are not available to use for a Search campaign type.
b. Next, you’ll have to select a Campaign type. Each type comes with its own settings and determines where your ad will show.

For charities receiving the free $10,000 monthly Google Ad Grants credit, select Search as your campaign type and your ads will be shown next to Google search results.
STEP 3: Fill in the Campaign name and deselect the Search and Display Network options.

STEP 4: Select a relevant geo-targeting for your campaign.
You can either pick a specific country, city, or postal code

If you want your ads to be more targetted around a specific radius, choose the option ‘Enter another location’. Click ‘Advanced search’ and enter the name of the place or its coordinates then click ‘Save’.

STEP 5: Choose a relevant language to your nonprofit.

STEP 6: Set your campaign budget to $329 (for Google Ad Grants) and pick ‘Conversions’ to focus on.

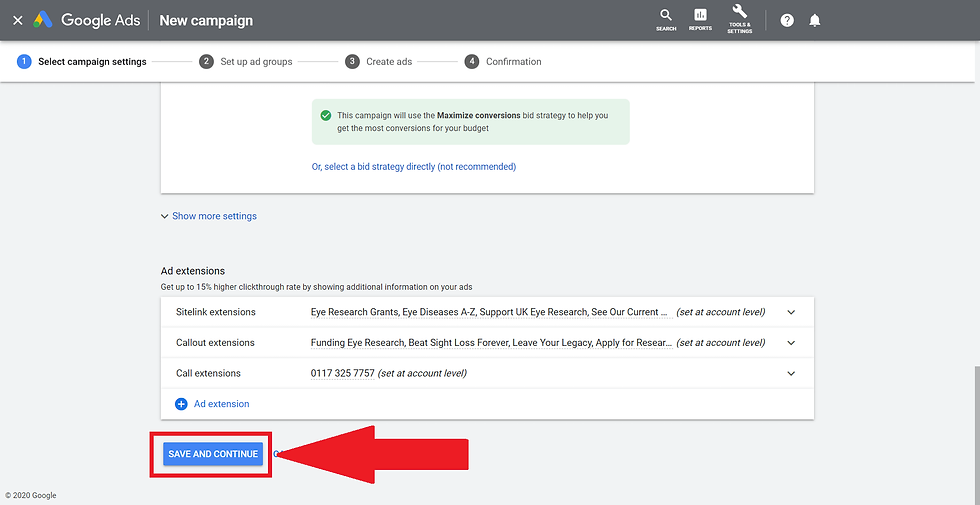
STEP 7: Check your sitelink, callout, and call extensions. Click ‘Save and Continue’ — your campaign is now ready!
Setting up your ad groups
Before you start writing your text ads that will run on Google search, you first have to create an ad group.
Google Ad Grants account need to have at least two ad groups under each campaign. An ad groups acts as a “container” for all of your close-knit keywords and go a long way in making your search PPC strategy more effective.
After clicking ‘Save and Continue’ in the previous campaign set up, you will be directed to the ad group set up page. Follow these 4 easy steps on how to create an ad group:

STEP 1: Decide on an ad group name — best if you use a particular keyword or a unifying theme of the keywords that you’re planning to use.
For instance, if you want to run a campaign on different eye diseases then you can have Cataracts, Glaucoma, Conjunctivitis, Macular Degeneration as the names of your ad groups.

STEP 2: If you haven’t gone through the keyword research process or if you don’t have much time to do so, you can use the Google keyword tool found on the right side of the ad group set up page. This can be helpful in finding related keyword ideas.
If you see a relevant keyword, click the (+) sign before it. But don’t just add all the keyword ideas suggested by Google, some might be irrelevant or more suitable in another ad group.

STEP 3: Add your keywords. Make sure these keywords are closely related to one another.
You can use a combination of different keyword match types in each ad group to weed out irrelevant search terms.

STEP 4: Google Ad Grants has established a couple of rules for their grantees to comply with. One of these is to have at least 2 ad groups for each active campaign.
So while you’re at the ad group set up page, just click ‘NEW AD GROUP’ at the bottom part of the page and repeat Step 1.

STEP 5: Once you have at least 2 ad groups with their corresponding keywords, just click ‘Save and Continue’.
Creating your ads

This is how a text ad is shown on Google search
Now we’ve come to the final part - writing your text ads. Through text ads, charities can build brand awareness by attracting more people to their website, reach potential donors, recruit more volunteers, deliver their services (a helpline, for example) — just to name a few.
It’s worth noting, however, that if a paying advertiser is bidding on the same keywords as your charity, the ads using Google Ad Grants will always appear below a paid ad.
Writing text ads is not as daunting as it appears to be. Follow these steps to set up 2 or more text ads in just one stroke.

STEP 1: Complete the following Google text ad fields:
Final URL - enter the URL where you want to deliver anyone who clicks your text ad; use a relevant landing page that corresponds to what your ad is about.
Headline 1 - match the first headline to one of your keywords to show your ad’s relevance to a searcher’s query
Headlines 2 & 3 - use these headlines for your calls-to-action or unique selling points; don’t skip these headlines as they help make your ad look more prominent (plus they won’t cost you extra money).
Display Path 1 & 2- the display path does not have to be a working URL, but still fill these in to give searchers an idea of what they would see upon clicking your ad.
Description 1 & 2 - use these fields to highlight more details about the service or product that you’re promoting; include calls-to-action to make the most out of the 90 character limit.
Google Ad Grants accounts need to have at least 2 ads per ad group for compliance. Once you complete all the needed fields on your first ad, proceed to creating the next one by clicking ‘Done and Create Next Ad’.
Having at least 2 text ads in your ad group gives you an opportunity to A/B test your calls-to action, phrasing, or other aspects of your ad copy. A/B testing or split-testing your text ads can give you an idea which ads performs better than the rest, then you can make the necessary changes based on your findings.
When you’re satisfied with the ads that you have created, click ‘Save and Continue’ to have a final look at your campaign settings:

Finally, click ‘Continue to Campaign’ and you’re all set to run your Google search ads!


